In this article
I will describe "How to Install Oracle 11g Forms and Reports 11.1.1.2.0 on Microsoft Window 7 Professional 32-bit" and then "How to Upgrade it to Oracle 11g Forms and Reports 11.1.1.3.0".
Download Forms and Reports 11.1.1.2.0, its patch 11.1.1.3.0 and Oracle WebLogic Server 10.3.5 for Microsoft Windows 32-bit from oracle website .
First of all you need to install Oracle WebLogic Server. You can find its installation on Red Hat Linux here. You can easily install it on Windows.
Extract the installation files and run the setup from Disk1.
 |
| Figure - 1 |
Click Next button.
 |
| Figure - 2 |
Select "Install Software - Do Not Configure" option and click Next. Don't Configure at this stage because 11.1.1.2.0 has compatibility issues with WebLogic Server 10.3.5.
 |
| Figure - 3 |
Click Next button.
 |
| Figure - 4 |
Specify the Middleware home which is created during WebLogic Server Installation and click Next button.
 |
| Figure - 5 |
|
|
|
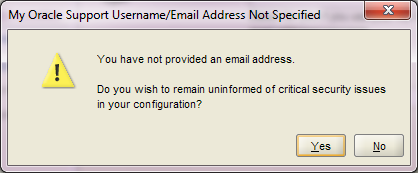
Uncheck the support checkbox and click Next button.
 |
| Figure - 6 |
Click Yes button.
 |
| Figure - 7 |
Click Install button.
 |
| Figure - 8 |
View progress.
 |
| Figure - 9 |
Click Next button.
 |
| Figure - 10 |
View summary and click Finish to finish installation of Oracle Forms and Reports 11.1.1.2.0. Extract the patch set 11.1.1.3.0 and run the setup.
 |
| Figure - 11 |
Click Next button.
 |
| Figure - 12 |
Specify the Middleware home which is created during WebLogic Server Installation and click Next button.
 |
| Figure - 13 |
Uncheck the support checkbox and click Next button.
 |
| Figure - 14 |
Click Yes button.
 |
| Figure - 15 |
Review the summary and click Install button.
 |
| Figure - 16 |
View progress.
 |
| Figure - 17 |
Click Next button.
 |
| Figure - 18 |
Review the summary and click Finish button to finish the installation of patch set 11.1.1.3.0. Select the "Configure Classic Instance" from "Start -> All Programs - > Oracle Classic 11g - Home1" Menu.
 |
| Figure - 19 |
Click Next button.
 |
| Figure - 20 |
Click Next button.
 |
| Figure - 21 |
Provide User Name and Password for new domain and click Next button.
 |
| Figure - 22 |
Uncheck the support checkbox and click Next button.
 |
| Figure - 23 |
Click Next button.
 |
| Figure - 24 |
Click Next button.
 |
| Figure - 25 |
Click Next button.
 |
| Figure - 26 |
Click Next button.
 |
| Figure - 27 |
Provide proxy information or you can disable it as well and click Next button.
 |
| Figure - 28 |
Click Next button.
 |
| Figure - 29 |
Review the summary information and click Configure button.
 |
| Figure - 30 |
View progress.
 |
| Figure - 31 |
View progress.
 |
| Figure - 32 |
Oracle Forms and Reports 11g 11.1.1.3.0 is configured successfully.
Insha-Allah this will help and serve the purpose. For any corrections and improvements please suggest.