Showing posts with label Installation. Show all posts

Tuesday, February 26, 2013

How to setup sudo on Oracle Solaris 10


In the name of Allah, Most Gracious, Most Merciful

sudo program executes a command with super user privileges with out login with super user. su command do the same but requires to login with super user. In this article i will describe to install and configure sudo packages on Oracle Solaris 10.

You need to have following packages to properly install sudo program. I assumed fresh Oracle Solaris 10 installed which don't have following packages installed.


You can get stable (or latest) releases of these packages from this website. you can use pkginfo command to check if these packages are already installed on your system.

pkginfo SMClinconv

You can install the above packages by transferring these packages to Solaris system and then switch to root user.

su - root
gunzip libiconv-1.9.2-sol10-x86-local.gz
pkgadd -d libiconv-1.9.2-sol10-x86-local

gunzip libgcc-3.4.6-sol10-x86-local.gz
pkgadd -d libgcc-3.4.6-sol10-x86-local

gunzip libintl-3.4.0-sol10-x86-local.gz
pkgadd -d libintl-3.4.0-sol10-x86-local

gunzip sudo-1.8.3p2-sol10-x86-local.gz
pkgadd -d sudo-1.8.3p2-sol10-x86-local

respond with "add" and "y" to questions asked by pkgadd program.

Now you can create symbolic link for sudo program
ln -s /usr/local/etc/sudoers /etc/sudoers
ln -s /usr/local/bin/sudo /bin/sudo
ln -s /usr/local/bin/sudoedit /bin/sudoedit 
Now last thing is to add privileged users to /etc/sudoers
This file has 0440 privileged so you need make is writable to add users.
chmod 0777 /etc/sudoers
vi /etc/sudoers
##
## User privilege specification
##
root ALL=(ALL) ALL
oracle ALL=(ALL) ALL 
now save and change file privileges to 0440 by using following command
chmod 0440 /etc/sudoers
Now exit from root and verify command by following method
/bin/sudo -u root /usr/sbin/ping localhost
If everything is write you will see response 
localhost is alive
if some library missing error you can see which library is missing by using
following command with root user
ldd /bin/sudo
you will see some (file not found) errors. note library name and download the
packages and use the above method to install missing packages.

Installation and Configuration of sudo program completes. Insha-Allah this will
help and serve the purpose. For any corrections and improvements please suggest.


Wednesday, November 28, 2012

How to Install and Configure VNC Server on CentOS 5


In the name of Allah, Most Gracious, Most Merciful.
 

In this article I will describe the Installation and Configuration of VNC Server on CentOS 5. First you need to check for already installed VNC Server. You can check this by executing following command.


rpm -q vnc-server


If you found message like  "package vnc-server is not installe" then you need to install it first by executing following command from root user.

yum install vnc-server

Once VNC Server installed you need to have a window manager installed if not already available. execute following command to install 'GNOME Desktop Environment' from root user.

yum groupinstall "GNOME Desktop Environment"

Figure - 1

Figure - 2


Figure - 3

Now change the configuration of VNC Server's configuration file

cd /etc/sysconfig
vi vncservers

Figure -4
add following lines to the file. change anyusername to your already created username.

VNCSERVERS="1:anyusername"
VNCSERVERARGS[1]="-geometry 1024x768"

Figure - 5

now login to "anyusername" and configure the vnc password for this user

vncpasswd

Figure - 6


Now login with root user and start the "vnc server"

/sbin/service vncserver start

Figure -7
Now stop the vnc server

/sbin/service vncserver stop

Configure the vnc server for autostartup

/sbin/chkconfig vncserver on

Figure - 8

Now login to "anyusername"

su - anyusername
cd .vnc
vi xstartup

Figure - 9

uncomment following lines by deleting "#" sign

unset SESSION_MANAGER
exec /etc/X11/xinit/xinitrc

and change the xterm command as follows

xterm -geometry 1024x768 -ls -title "&VNCDESKTOP Desktop" & gnome-session &

Figure - 10

now start the vnc server again by root user

/sbin/service vncserver start

Once started you can now install the vnc client in you client machine and login to CentOs machine as follows


Figure - 11

Click Connect.
 

Figure - 12

Provide VNC password for user and click OK
 
Figure - 13
 
Desktop screen appreas.

Installation and Configuration of VNC Server completes. Insha-Allah this will help and serve the purpose. For any corrections and improvements please suggest.


Sunday, August 26, 2012

How to Install Oracle Business Intelligence Enterprise Edition 11.1.1.6.0 (OBIEE) on Solaris 10 64-bit

In the name of Allah, Most Gracious, Most Merciful.
In this article I will describe the Installation of Oracle Business Intelligence Enterprise Edition 11.1.1.6.0 (OBIEE) on Solaris 10 64-bit. Before proceeding with installation make sure that you have created required database bi schema by running Repository Creation Utility (11.1.1.6.0). You can download the windows version of the utility and execute on database. Please find Oracle Database 11g installation on Solaris 10 64-bit here.

Download Repository Creation Utility (11.1.1.6.0) for windows and extract it on file system. Run following bat file

rcuHome\BIN\rcu.bat

Figure - 1

 Click "Next" or "تالى".


Figure - 2

 Select "Create" and click "Next" or "تالى".


Figure - 3

Provide database connection information and click "Next" or "تالى".

Figure - 4

 If your database character set is non-AL32UTF8 then above warning message will appear you can igrore it.

Figure - 5

Click OK.

Figure - 6

 Specify schema prefix and click "Next" or "تالى".

Figure - 7

Click OK

Figure - 8

 Specify password for database schema and click "Next" or "تالى".

Figure - 9

 Provide tablespace information and click "Next" or "تالى".

Figure - 10

Click OK
Figure - 11

 Click OK

Figure - 12

 Click Create.

Figure - 13

Click Finish. Repository Creation Utility completed successfully. Now run installer for Oracle Business Intelligence Enterprise Edition from Solaris 10 system by running following command.

Disk1/runInstaller

Figure - 14

Click Next.
Figure - 15

 Select "Skip Software Update" and click Next.

Figure - 16

 Select "Enterprise Install" and click Next.

Figure - 17

 Click Next.

Figure - 18

Provide new weblogic domain information and click Next.

Figure - 19

Provide new Middleware home location and click Next.

Figure - 20

Provide database connection information and password for DEV_BIPLATFORM schema that was created by RCU and click Next.

Figure - 21

Provide database connection information and password for DEV_MDS schema that was created by RCU and click Next.

Figure - 22

Click Next.

Figure - 23
Click Next.

Figure - 24

Uncheck the updates check box and click Next.
Figure - 25

 Click Yes.

Figure - 26

 Click Next.

Figure - 27

 View progress.

Figure - 28

View progress.

Figure - 29

View progress.
Figure - 30

View progress.
Figure - 31

 View URL information and click Finish.

Figure - 32

Run the URL of "Business Intelligence Enterprise Edition" from Figure - 31 in a browser. Provide weblogic as username and its password to logon.

Installation of Oracle Business Intelligence Enterprise Edition 11g 11.1.1.6.0 on Solaris 10 64-bit completes. Insha-Allah this will help and serve the purpose. For any corrections and improvements please suggest.


Monday, June 11, 2012

How to install Oracle Enterprise Manager Cloud Control 12c 64-bit on Solaris 10 64-bit

In the name of Allah, Most Gracious, Most Merciful.

In this article I will describe the installation of Oracle Enterprise Manager Cloud Control 12c 12.1.0.1.0 64-bit installation On Oracle Solaris 10 64-bit. Before proceeding make sure that repository database is already installed. You can find the 11gR2 database installation here. Installation of database completes most of the system parameter settings. 

Before installation of Enterprise  Manager you need to de-configure the database control repository from the above installed database. Run the following command from "oracle" user to do so.

$ emca -deconfig dbcontrol db -repos drop

Provide sys and sysman user passwords when prompted. Backup the spfile and execute the following commands on terminal.

sqlplus / AS SYSDBA 

ALTER SYSTEM SET processes=300 SCOPE=SPFILE;
ALTER SYSTEM SET session_cached_cursors=200 SCOPE=SPFILE;
ALTER SYSTEM SET job_queue_processes=20 SCOPE=SPFILE;

SHUTDOWN IMMEDIATE
STARTUP

Download the Enterprise Manager Cloud Control 12c 12.1.0.1.0 64-bit for Solaris 64-bit and extract it. 

cd /export/home/oracle

$ unzip em12_solarisx64_disk1of2.zip
$ unzip em12_solarisx64_disk2of2.zip

$ ./runInstaller

Figure - 1

Un-check the security updates check box and click Next.
Figure - 2

Click Yes.
Figure - 3


Select the "Skip" radio option and click Next.

Figure - 4

 Click Next.

Figure - 5

Select "Advanced" option in "Create a new Enterprise Manager System" option. Provide Middleware Home Location and click Next.

Figure - 6

Select the management capabilities of your choice and click Next.

Figure - 7

Provide Weblogic and Nodemanager information and click Next.
Figure - 8

Provide installed database connection information and click Next.

Figure - 9

Click Yes.

Figure - 10

Click Yes.
Figure - 11

 Provide sysman's password and oms registration password and click Next.

Figure - 12

Click Next.

Figure - 13

Review information and click Next.
Figure - 14

Review information and click Next.

Figure - 15

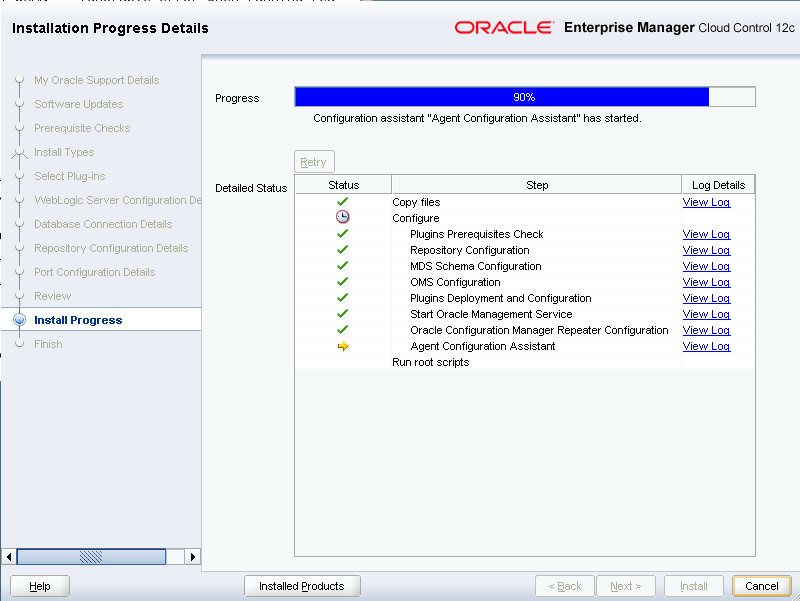
Review progress.

Figure - 16

Review progress.
Figure - 17

Review progress.
Figure - 18

Open a terminal and run the above mentioned script with "root" user.

Figure - 19

Review information, copy Enterprise Manager Cloud Control URL and paste in a browser.
Figure - 20


Enter sysman and its password and click Login.


Figure - 21


Add following variables in oracle user's profile.


ORACLE_BASE=/u01/app/oracle
export ORACLE_BASE
 
ORACLE_HOME=$ORACLE_BASE/product/11.2.0.3/db_1
export ORACLE_HOME
 
OMS_HOME=$ORACLE_BASE/middleware/oms
export OMS_HOME
 
AGENT_HOME=$ORACLE_BASE/middleware/agent/core/12.1.0.1.0
export AGENT_HOME


Start Enterprise Manager by executing following commands.

$ cd ~
$ . ./.profile
 
$ORACLE_HOME/bin/dbstart $ORACLE_HOME
$OMS_HOME/bin/emctl start oms
$AGENT_HOME/bin/emctl start agent


Stop Enterprise Manager by executing following commands. 
 
$OMS_HOME/bin/emctl stop oms -all
$AGENT_HOME/bin/emctl stop agent
$ORACLE_HOME/bin/dbshut $ORACLE_HOME


Insha-Allah this will help and serve the purpose. For any corrections and improvements please suggest.