Showing posts with label Oracle. Show all posts

Monday, March 11, 2013

How to configure Samba in Oracle Solaris 10

In the name of Allah, Most Gracious, Most Merciful

Samba comes installed with Oracle Solaris 10. We only have to configure it according to our needs. Following are steps to properly configure samba according to our needs.

You can verify that samba packages are already installed in Oracle Solaris 10 by following command.

1. pkginfo -x | grep -i samba

SUNWsmbac    samba - A Windows SMB/CIFS fileserver for UNIX (client)
SUNWsmbar    samba - A Windows SMB/CIFS fileserver for UNIX (Root)
SUNWsmbau    samba - A Windows SMB/CIFS fileserver for UNIX (Usr)


2. You can check the location of samba config file by following command

pkgchk -l SUNWsmbar | grep conf-example

Pathname: /etc/samba/smb.conf-example

3. Check current state of samba

svcs -a | grep samba

disabled       Feb_22   svc:/network/samba:default

4. Try to enable samba

svcadm enable samba

maintenance    10:27:33 svc:/network/samba:default

It is not enabled, but it is in maintenance mode. You can check the errors encountered while enabling samba by following command.

tail /var/adm/messages

mysystem svc.startd[8]: [ID 652011 daemon.warning] svc:/network/samba:default: Method "/usr/sbin/smbd -D" failed with exit status 1

It means samba failed to start, it most likely due to missing config file.

5. Now copy the sample config file and modify it

cp /etc/samba/smb.conf-example /etc/samba/smb.conf

By default config file is readonly, so make is right able by following command.

chmod 0777 /etc/samba/smb.conf

vi /etc/samba/smb.conf

Add following section in smb.conf file.

[myshare]
comment = My Share
force user = oracle
path = /u01/app/oracle
writeable = no
guest ok = yes


now save file and exit vi.

6. Now change the rights on smb.conf file as before

chmod 0444 /etc/samba/smb.conf

7. Now try to disable samba

svcadm disable samba
svcs -a | grep samba

disabled       10:41:49 svc:/network/samba:default


8. Now try to enable samba again

svcadm enable samba
svcs -a | grep samba

online         10:42:04 svc:/network/samba:default


9. Now set password for oracle user to use "myshare".

smbpasswd -a oracle

10. Now on windows try to map drive

net use O: \\192.168.1.20\myshare

Configuration of samba completes. In-sha-Allah this will help and serve the purpose. For any corrections and improvements please suggest.


Sunday, September 23, 2012

Table Compression

In the name of Allah, Most Gracious, Most Merciful

Use following link for article.


I hope it will serve the purpose.

Monday, May 14, 2012

How to install Oracle Database 11gR2 11.2.0.3.0 64-bit On Oracle Solaris 10 64-bit

In this article I will describe the installation of Oracle Database 11gR2 11.2.0.3 64-bit on Oracle Solaris 10 64-bit.

Login with root user, open a terminal and check the physical memory by issuing following command.

/usr/sbin/prtconf | grep "Mem"

Memory should be approximately 1 GB otherwise it will fail the memory check (ignorable) during the installation as in my case.

Check the swap space available by issuing following command.

/usr/sbin/swap -l

Available swap should be approximately 1.5 GB. if you have swap space less then 1.5 GB you can add swap file by issuing following command.

mkfile 1024m /export/home/swapfile
swap -a /export/home/swapfile

Add the following entry in /etc/vfstab

/export/home/swapfile    -    -    swap    -    no    -

You can also check the space available under /tmp by issuing following command.

df -h /tmp

Check the hardware information by issuing following command.

/bin/isainfo -kv

Following should appear as the result of command above otherwise Oracle Database 11gR2 64-bit will not be installed.
64-bit amd64 kernel modules

Check the OS version installed by issuing following command.

uname -r

5.10 should appear as the result of command above.
Add following commands in /etc/system

    set noexec_user_stack=1
    set semsys:seminfo_semmni=100
    set semsys:seminfo_semmns=1024
    set semsys:seminfo_semmsl=256
    set shmsys:shminfo_semvmx=32767
    set shmsys:shminfo_shmmax=4294967295
    set shmsys:shminfo_shmmni=100
    set shmsys:shminfo_shmseg=10

Execute following commands to set tcp and upd port parameters

ndd -set /dev/tcp tcp_smallest_anon_port 9000
ndd -set /dev/tcp tcp_largest_anon_port 65500
ndd -set /dev/udp udp_smallest_anon_port 9000
ndd -set /dev/udp udp_largest_anon_port 65500


Check the value of max-shm-memory and max-sem-ids for the root user

prctl -n project.max-shm-memory -i project user.root
prctl -n project.max-sem-ids -i project user.root

Modify these parameters as follows

prctl -n project.max-shm-memory -v 6gb -r -i project user.root
prctl -n project.max-sem-ids -v 256 -r -i project user.root


Create "oracle" user for installation by issuing following commands.

groupadd oinstall
groupadd dba
groupadd oper
useradd -g oinstall -G dba,oper -m -d /export/home/orale -s /bin/sh oracle
passwd -r files oracle

Add oracle project by issuing following command

projadd oracle

And append the following line to the "/etc/user_attr" file.

    oracle::::project=oracle

Open a new terminal and login with oracle the issue following commands from root's terminal

prctl -n project.max-shm-memory -v 4gb -r -i project oracle
projmod -s -K "project.max-shm-memory=(priv,4gb,deny)" oracle

From root user install SUNWi1cs and SUNWi15cs packages by issuing following commands. these packages are available in Solaris 10 DVD.

pkgadd -d /cdrom/sol_10_811_x86/Solaris_10/Product SUNWi1cs SUNWi15cs
Create database installation directories by issuing following commands

mkdir -p /u01/app/oracle
chown -R oracle:oinstall /u01/app/oracle
chmod -R 775 /u01/app/oracle/

Login with oracle user and add following line into .profile

umask 022 
ORACLE_BASE=/u01/app/oracle
export ORACLE_BASE
ORACLE_SID=orcl
export ORACLE_SID

Now execute the .profile by issuing following commands

. ./.profile

Download Oracle Database 11gR2 11.2.0.3.0 64-bit from Oracle Software Delivery Cloud and extract it to some where lets say /export/home/oracle/

cd /export/home/oracle/database
./runInstaller
 
Figure - 1

Un check  the security updates check box and click Next.

Figure - 2

Click Yes.
Figure - 3
Select Skip software updates and click Next.

Figure - 4

Select "Create and configure a database" and click Next.

Figure - 5

Select "Server Class" and click Next.
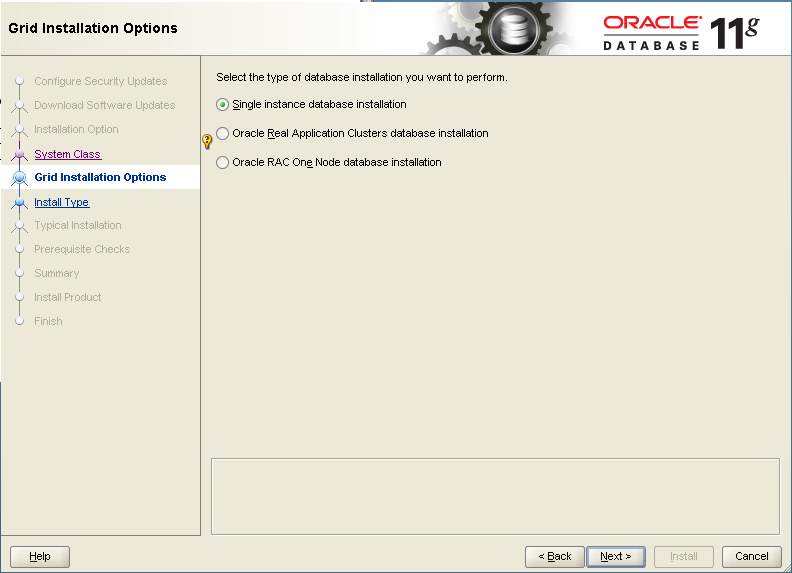
Figure - 6

Select "Single Instance database installation" and click Next.

Figure - 7

Select "Advanced Install" and click Next.
Figure - 8

Select Languages and click Next.

Figure - 9

Select "Enterprise Edition" and click Next.
Figure - 10

Provide "Oracle Base" and "Software Location" parameters and click Next.
Figure - 11

Provide "Inventory Directory" and click Next.

Figure - 12

Select "General Purpose" and click Next.
Figure - 13

Provide "SID" and click Next.
Figure - 14

Provide Memory Information and click Next. You can also enable "Automatic Memory Management" feature.

Figure - 15

Provide Character Information and click Next.

Figure - 16

click Next.

Figure - 17

click Next.

Figure - 18

Select "Do not enable automated backup"  and click Next. You can specify jobs according to your recovery strategy later on.

Figure - 19

Provide password information and click Next.

Figure - 20

click Yes.

Figure - 21

Provide dba and oper roles and click Next.

Figure - 22

By default oracle check for swap space = 2 times ram size. You can simply ignore this check. click "Ignore All"
 
Figure - 23

Click Next.

Figure - 24

Click Yes.

Figure - 25

Click Install.
Figure - 26

View progress.

Figure - 27

View progress.

Figure - 28
click Close.

Figure - 29

Provide username and password and click Login.

Figure - 30

Insha-Allah this will help and serve the purpose. For any corrections and improvements please suggest.


Tuesday, May 8, 2012

How to fix "REP-69: An internal error occurred while reading the image - Unable to render RenderedOp for this operation"

In the name of Allah, the most Beneficial, the most Merciful

In this article i will be describing How to fix "REP-69: An internal error occurred while reading the image - Unable to render RenderedOp for this operation". 

Some times pages of output report on web displayed black and error occurs while running report REP-69: An internal error occurred while reading the image - Unable to render RenderedOp for this operation.

This problem occurs when an image is used in the report without setting the OUTPUTIMAGEFORMAT variable. Set OUTPUTIMAGEFORMAT=GIF in the URL/command line or environment variable. Also set REPORTS_DEFAULT_DISPLAY=NO in environment variable. This should be specified in OS's environment variable on which report server is installed. Restart report server to incorporate changes.

Insha-Allah this will help and serve the purpose. For any corrections and improvements please suggest.