In this article
I will describe the installation of Oracle Database 11gR2 11.2.0.3 64-bit on Oracle Solaris 10 64-bit.
Login with root user, open a terminal and check the physical memory by issuing following command.
/usr/sbin/prtconf | grep "Mem"
Memory should be approximately 1 GB otherwise it will fail the memory check (ignorable) during the installation as in my case.
Check the swap space available by issuing following command.
/usr/sbin/swap -l
Available swap should be
approximately 1.5 GB. if you have swap space less then 1.5 GB you can add
swap file by issuing following command.
mkfile 1024m /export/home/swapfile
swap -a /export/home/swapfile
Add the following entry in /etc/vfstab
/export/home/swapfile - - swap - no -
You can also check the space available under /tmp by issuing following command.
df -h /tmp
Check the hardware information by issuing following command.
/bin/isainfo -kv
Following should appear as the result of command above otherwise Oracle Database 11gR2 64-bit will not be installed.
64-bit amd64 kernel modules
Check the OS version installed by issuing following command.
uname -r
5.10 should appear as the result of command above.
Add following commands in /etc/system
set noexec_user_stack=1
set semsys:seminfo_semmni=100
set semsys:seminfo_semmns=1024
set semsys:seminfo_semmsl=256
set shmsys:shminfo_semvmx=32767
set shmsys:shminfo_shmmax=4294967295
set shmsys:shminfo_shmmni=100
set shmsys:shminfo_shmseg=10
Execute following commands to set tcp and upd port parameters
ndd -set /dev/tcp tcp_smallest_anon_port 9000
ndd -set /dev/tcp tcp_largest_anon_port 65500
ndd -set /dev/udp udp_smallest_anon_port 9000
ndd -set /dev/udp udp_largest_anon_port 65500
Check the value of max-shm-memory and max-sem-ids for the root user
prctl -n project.max-shm-memory -i project user.root
prctl -n project.max-sem-ids -i project user.root
Modify these parameters as follows
prctl -n project.max-shm-memory -v 6gb -r -i project user.root
prctl -n project.max-sem-ids -v 256 -r -i project user.root
Create "oracle" user for installation by issuing following commands.
groupadd oinstall
groupadd dba
groupadd oper
useradd -g oinstall -G dba,oper -m -d /export/home/orale -s /bin/sh oracle
passwd -r files oracle
Add oracle project by issuing following command
projadd oracle
And append the following line to the "/etc/user_attr" file.
oracle::::project=oracle
Open a new terminal and login with oracle the issue following commands from root's terminal
prctl -n project.max-shm-memory -v 4gb -r -i project oracle
projmod -s -K "project.max-shm-memory=(priv,4gb,deny)" oracle
From root user install SUNWi1cs
and SUNWi15cs packages by issuing following commands. these packages are
available in Solaris 10 DVD.
pkgadd -d /cdrom/sol_10_811_x86/Solaris_10/Product SUNWi1cs SUNWi15cs
Create database installation directories by issuing following commands
mkdir -p /u01/app/oracle
chown -R oracle:oinstall /u01/app/oracle
chmod -R 775 /u01/app/oracle/
Login with oracle user and add following line into .profile
umask 022
ORACLE_BASE=/u01/app/oracle
export ORACLE_BASE
ORACLE_SID=orcl
export ORACLE_SID
Now execute the .profile by issuing following commands
. ./.profile
cd /export/home/oracle/database
./runInstaller
 |
| Figure - 1 |
Un check the security updates check box and click Next.
 |
| Figure - 2 |
Click Yes.
 |
| Figure - 3 |
Select Skip software updates and click Next.
 |
| Figure - 4 |
Select "Create and configure a database" and click Next.
 |
| Figure - 5 |
Select "Server Class" and click Next.
 |
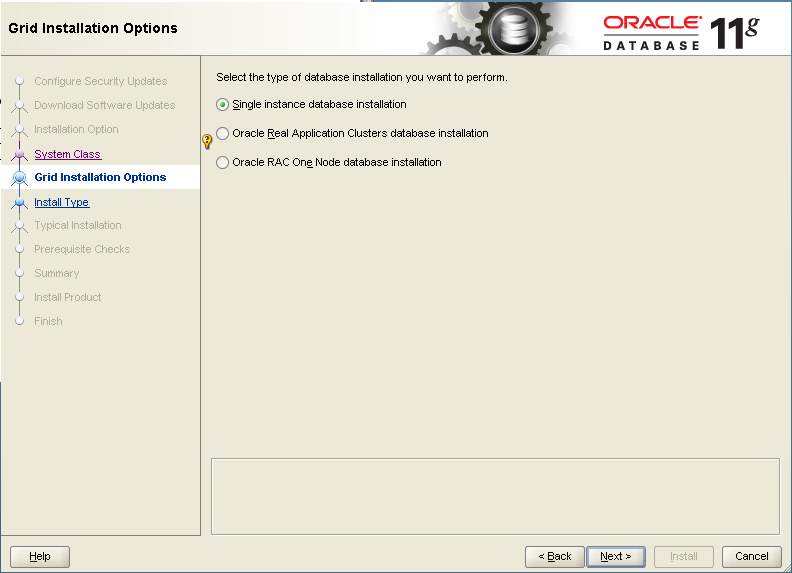
| Figure - 6 |
Select "Single Instance database installation" and click Next.
 |
| Figure - 7 |
Select "Advanced Install" and click Next.
 |
| Figure - 8 |
Select Languages and click Next.
 |
| Figure - 9 |
Select "Enterprise Edition" and click Next.
 |
| Figure - 10 |
Provide "Oracle Base" and "Software Location" parameters and click Next.
 |
| Figure - 11 |
Provide "Inventory Directory" and click Next.
 |
| Figure - 12 |
Select "General Purpose" and click Next.
 |
| Figure - 13 |
Provide "SID" and click Next.
 |
| Figure - 14 |
Provide Memory Information and click Next. You can also enable "Automatic Memory Management" feature.
 |
| Figure - 15 |
Provide Character Information and click Next.
 |
| Figure - 16 |
click Next.
 |
| Figure - 17 |
click Next.
 |
| Figure - 18 |
Select "Do not enable automated backup" and click Next. You can specify jobs according to your recovery strategy later on.
 |
| Figure - 19 |
Provide password information and click Next.
 |
| Figure - 20 |
click Yes.
 |
| Figure - 21 |
Provide dba and oper roles and click Next.
 |
| Figure - 22 |
By default oracle check for swap space = 2 times ram size. You can simply ignore this check. click "Ignore All"
 |
| Figure - 23 |
Click Next.
 |
| Figure - 24 |
Click Yes.
 |
| Figure - 25 |
Click Install.
 |
| Figure - 26 |
View progress.
 |
| Figure - 27 |
View progress.
 |
| Figure - 28 |
click Close.
 |
| Figure - 29 |
Provide username and password and click Login.
 |
| Figure - 30 |
Insha-Allah this will help and serve the purpose. For any corrections and improvements please suggest.